2021-04-04 23:35
keepalivedによるロードバランサー構築(DRモード編)
最終更新日時:2012-10-15 21:16
初版公開日時:2012-10-15 21:16
タグ: keepalived linux
keepalivedを構築してwebサーバ群へ負荷分散環境を構築します。
keepalivedサーバの環境は以下です。
OS - CentOS 6.3 x86_64
台数 - 2台
各サーバのNIC数 - 1つ
keepalivedの設定 - DRモード
バックエンドとなるwebサーバの環境は以下です。
webサーバのOS - Debian GNU/Linux wheezy amd64
webサーバの台数 - 3台
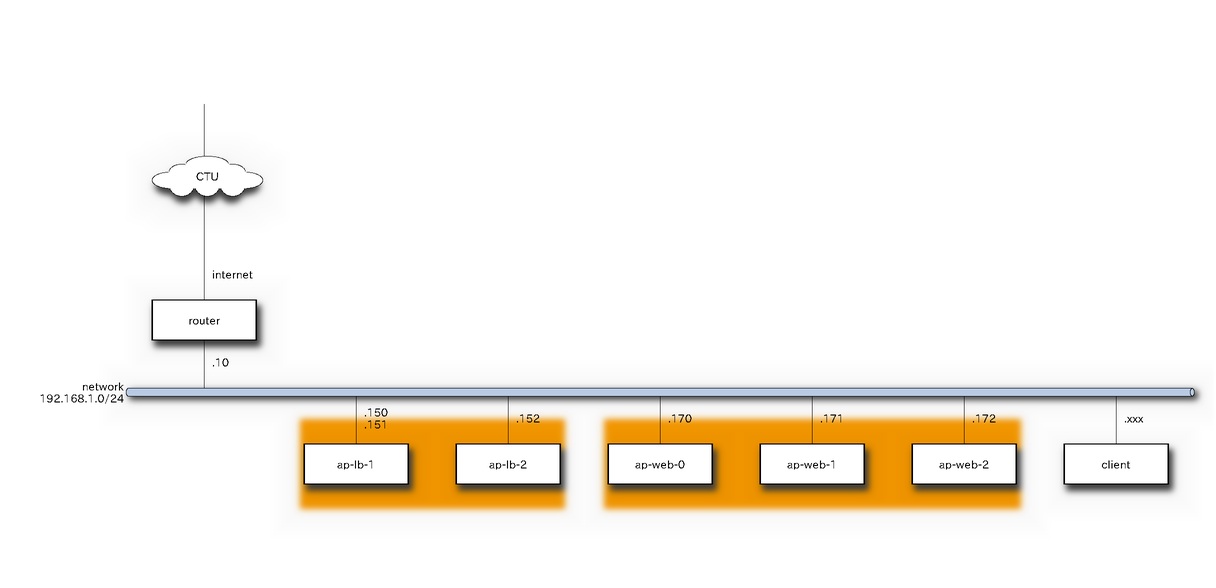
以下はサーバの構成図とします。
keepalivedサーバの設定
keepalivedをインストールします。
$ sudo yum install wget
$ wget http://ftp-srv2.kddilabs.jp/Linux/distributions/fedora/epel/6/x86_64/epel-release-6-7.noarch.rpm
$ sudo rpm -ivh epel-release-6-7.noarch.rpm
$ ls /etc/yum.repos.d
CentOS-Base.repo       CentOS-Media.repo  epel-testing.repo
CentOS-Debuginfo.repo  CentOS-Vault.repo  epel.repo
$ sudo yum check-update
[norimitu@ap-lb-1 yum.repos.d]$ yum search keepalived
Loaded plugins: fastestmirror, presto
Loading mirror speeds from cached hostfile
 * base: rsync.atworks.co.jp
 * epel: ftp.iij.ad.jp
 * extras: rsync.atworks.co.jp
 * updates: rsync.atworks.co.jp
==================================== N/S Matched: keepalived ====================================
keepalived.x86_64 : High Availability monitor built upon LVS, VRRP and service pollers

$ sudo yum install keepalived
=================================================================================================
 Package                        Arch            Version                   Repository        Size
=================================================================================================
Installing:
 keepalived                     x86_64          1.2.7-1.el6               epel             182 k
Installing for dependencies:
 lm_sensors-libs                x86_64          3.1.1-10.el6              base              37 k
 net-snmp-libs                  x86_64          1:5.5-41.el6_3.1          updates          1.5 M
 perl                           x86_64          4:5.10.1-127.el6          base              10 M
 perl-Module-Pluggable          x86_64          1:3.90-127.el6            base              38 k
 perl-Pod-Escapes               x86_64          1:1.04-127.el6            base              30 k
 perl-Pod-Simple                x86_64          1:3.13-127.el6            base             210 k
 perl-libs                      x86_64          4:5.10.1-127.el6          base             576 k
 perl-version                   x86_64          3:0.77-127.el6            base              49 k

Transaction Summary
=================================================================================================
Install       9 Package(s)

Total download size: 13 M
Installed size: 42 M
Is this ok [y/N]: y

$ rpm -qa | grep keepalived
keepalived-1.2.7-1.el6.x86_64

$ sudo yum install keepalived
================================================================================
 Package           Arch             Version                Repository      Size
================================================================================
Installing:
 ipvsadm           x86_64           1.25-10.el6            base            41 k

Transaction Summary
================================================================================
Install       1 Package(s)

Total download size: 41 k
Installed size: 74 k
Is this ok [y/N]: y

$ rpm -qa | grep ipvsadm
ipvsadm-1.25-10.el6.x86_64
keepalivedサーバにきたパケットをwebサーバに渡すため、以下の設定を変更する。
修正前)net.ipv4.ip_forward = 0
修正後)net.ipv4.ip_forward = 1
/etc/keepalived.confの設定をします。priorityのところ以外は同じです。両方をBACKUPに設定しているのは、どちらかのサーバが落ちてから復活したときに勝手に切り替わらないようにするためです。(好き嫌いやポリシーによるのでそこはお好みに)
global_defs {
   notification_email {
   }
   notification_email_from yourname@example.com
   smtp_server 127.0.0.1
   smtp_connect_timeout 30
   router_id LVS_DEVEL
}

vrrp_sync_group VRRP_LVS {
    group {
      VI_1
    }
}

vrrp_instance VI_1 {
    state BACKUP
    nopreempt
    interface eth0
    lvs_sync_daemon_inteface eth0
    virtual_router_id 51
    priority 90
    # for master set 90.
    # for backup set 100.
    advert_int 3
    authentication {
        auth_type PASS
        auth_pass 12345678
    }
    virtual_ipaddress {
        192.168.1.150/24 dev eth0
    }
}

virtual_server 192.168.1.150 80 {
    delay_loop 3
    lb_algo rr
    lb_kind DR

    #persistence_timeout 50
    protocol TCP

    sorry_server 192.168.1.170 80

    real_server 192.168.1.170 80 {
        weight 4
        inhibit_on_failure
        HTTP_GET {
            url {
              path /index.html
              status_code 200
            }
            connect_timeout 3
            nb_get_retry 3
            delay_before_retry 3
        }
    }

    real_server 192.168.1.171 80 {
        weight 3
        inhibit_on_failure
        HTTP_GET {
            url {
              path /index.html
              status_code 200
            }
            connect_timeout 3
            nb_get_retry 3
            delay_before_retry 3
        }
    }

    real_server 192.168.1.172 80 {
        weight 2
        inhibit_on_failure
        HTTP_GET {
            url {
              path /index.html
              status_code 200
            }
            connect_timeout 3
            nb_get_retry 3
            delay_before_retry 3
        }
    }
}
$ sudo service keepalived restart
iptablesを設定します。/etc/sysconfig/iptablesを編集します。まずは、ssh、httpを開けます。"-p 112"を開けているのは、keepalivedが内部で使用しているプロトコル番号VRRPのことです。
# Firewall configuration written by system-config-firewall
# Manual customization of this file is not recommended.
*filter
:INPUT ACCEPT [0:0]
:FORWARD ACCEPT [0:0]
:OUTPUT ACCEPT [0:0]
-A INPUT -m state --state ESTABLISHED,RELATED -j ACCEPT
-A INPUT -p icmp -j ACCEPT
-A INPUT -i lo -j ACCEPT
-A INPUT -m state --state NEW -m tcp -p tcp --dport 22 -j ACCEPT
-A INPUT -m state --state NEW -m tcp -p tcp --dport 80 -j ACCEPT
-A INPUT -m state --state NEW -p 112 -j ACCEPT
-A INPUT -j REJECT --reject-with icmp-host-prohibited
-A FORWARD -j REJECT --reject-with icmp-host-prohibited
COMMIT
$ sudo service iptables restart
これで、keepalivedサーバの設定は終わりです。
webサーバの設定
apache2をインストールし、index.htmlを準備します。テストのページ内に各ポストのIPアドレスを埋め込んでおきます。
$ sudo apt-get update
$ sudo apt-get install apache2
$ cd /var/www
$ sudo vi index.html
<html><body><p>This is the default web page for this server.</p>
<p>The web server software is running but no content has been added, yet.</p>
<p>192.168.1.170<p/>
</body></html>
iptablesをインストールします
$ sudo apt-get install iptables iptables-persistent

※iptablesの設定ファイルは以下に保存されます。
/etc/iptables/rules.v4
/etc/iptables/rules.v6
DRモードのため、webサーバへforwardされたパケットのsrcアドレスはkeepalivedサーバの仮想IPになります。このままだとwebサーバは捨ててしまうので、keepalivedサーバ宛のsrcアドレスをもつパケットがきた場合はloへ渡して受け入れるようにします。
$ sudo vi /etc/iptables/rules.v4

# Generated by iptables-save v1.4.14 on Wed Dec 12 23:04:25 2012
*nat
:PREROUTING ACCEPT [450:30770]
:INPUT ACCEPT [451:30822]
:OUTPUT ACCEPT [47:3458]
:POSTROUTING ACCEPT [47:3458]

# accept packet from keepalived DR mode.
-A PREROUTING -d 192.168.1.150/32 -j REDIRECT
-A PREROUTING -d 192.168.1.151/32 -j REDIRECT
-A PREROUTING -d 192.168.1.152/32 -j REDIRECT

COMMIT
# Completed on Wed Dec 12 23:04:25 2012
# Generated by iptables-save v1.4.14 on Wed Dec 12 23:04:25 2012
*filter
:INPUT ACCEPT [3839:849806]
:FORWARD ACCEPT [0:0]
:OUTPUT ACCEPT [3238:470710]
COMMIT
# Completed on Wed Dec 12 23:04:25 2012
iptablesのルールを適用します。
$ sudo /etc/init.d/iptables-persistent restarat
動作確認します
clientマシンからcurlを実行して動作確認します。webブラウザを使うとキャッシュを表示してしまう場合があり、バランシングされていないように見える場合がありますので、curlを使うのをおすすめします。
$curl http://192.168.1.150/index.html
<html><body>
<p>This is the default web page for this server.</p>
<p>The web server software is running but no content has been added, yet.</p>
<p>192.168.1.172</p>
</body></html>
$ curl http://192.168.1.150/index.html
<html><body>

This is the default web page for this server.</p>
<p>The web server software is running but no content has been added, yet.</p>
<p>192.168.1.171</p>
</body></html>
$ curl http://192.168.1.150/index.html
<html>
The web server software is running but no content has been added, yet.</p>
<p>192.168.1.170
</body></html>
$ curl http://192.168.1.150/index.html
<html><body>
<p>This is the default web page for this server.</p>
<p>The web server software is running but no content has been added, yet.</p>
<p>192.168.1.172</p>
</body></html>
$ curl http://192.168.1.150/index.html
<html><body>
<p>This is the default web page for this server.</p>
<p>The web server software is running but no content has been added, yet.</p>
<p>192.168.1.171</p>
</body></html>
$ curl http://192.168.1.150/index.html
<html>
<p>This is the default web page for this server.</p>
<p>The web server software is running but no content has been added, yet.</p>

192.168.1.170</html>
$ curl http://192.168.1.150/index.html
<body>

This is the default web page for this server.</p>
<p>The web server software is running but no content has been added, yet.</p>
<p>192.168.1.172</p>
</body></html>
ロードバランシングできました。
関連記事
ansibleのplaybook作成をしてみる
Linuxの無線LANドライバのパラメータ
2015-03-29 19:51
apache + python cgiでxmlrpc
2011-08-19 21:56

最近の更新記事
2024年4月 東京エリア・関西合同Debian勉強会
2024-04-20 22:00
新年度になりました
2024-04-06 18:00
持っているPCのPassMark CPU Benchmarksの数値
2024-03-09 10:00
HP ProBook 635 Aero G7
2024-03-08 22:00
VisionFive2とRaspberry Pi Zero 2 Wの電子工作
2024-03-03 23:50
OSC 2024 Online/Spring パネルディスカッション参加
2024-03-02 23:00
Lenovo Thinkpad L15 Gen 2
2024-02-27 23:00
天気がよくない3連休
2024-02-25 22:00
SONY VLOGCAM ZV-E10L/B
2024-02-23 22:00
2024年2月 東京エリア・関西合同Debian勉強会
2024-02-17 21:00